- You have no items in your shopping cart
- Subtotal: ₦0.00
Hi guys, this week we’re going to go a bit further in DigitalIO, Last week we explored the blink project, where we made an LED Blink, pretty simple and straightforward. What we have for this week is tocontrol an LED based on input from a push button.
Basically to toggle the LED state using the push button.
So let’s get started, shall we?
Required components
- Arduino UNO (or basically any Arduino board)
- An LED (Blue, red, yellow)
- Push button
- 1K Resistor
- 10K Resistor
Firstly, the connection.
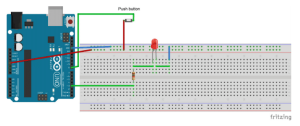
1. Wire up the LED in series with the 1K Resistor, connecting the positive terminal of the LED to one terminal of the resistor, then the other terminal of the resistor to pin 3 of the Arduino board, negative pin of the LED goes to ground, simple enough, right?
2.Next up the push button, your typical push button should have two terminals, if that’s the case, you’re good. Otherwise, if your push button has four terminals, don’t freak out, simply choose one pin from either side. The two pins on both sides are internally connected. So connect one terminal to the 5V pin of the Arduino, the other pin should be connected to digital pin 8.
Schematics
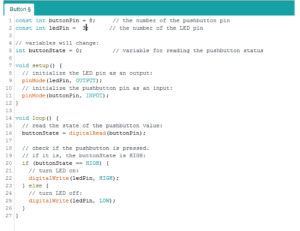
Code:
So let’s go through this line by line, alright?
const int buttonPin = 8; // the number of the pushbutton pin
const int ledPin = 3; // the number of the LED pin
The first 2 lines are simple enough, just declaring the pins that would be required of the Arduino.
int buttonState = 0; // variable for reading the pushbutton status
The variable buttonState will be used to keep track of the button, checking whether it’s pressed or not. It is initialized to 0(i.e NOT PRESSED).
So in the void setup function we set the pin mode of the led and the push button.
pinMode(ledPin, OUTPUT);
pinMode(buttonPin, INPUT);
So let’s go to the main stuff! The void loop function.
buttonState = digitalRead(buttonPin);
the digitalRead function is the input equivalent of the digitalWrite function you saw in the last post, like we used the digitalWrite to manipulate the state of the pin, set it to HIGH or LOW, the digitalRead function however is used to detect the state of the pin, to check whether the pin is HIGH or LOW.
So this line sets the buttonState variable to either LOW or HIGH depending on the state of the push button. If the button is pressed, this closes the circuit line from the 5V power pin connected to the push button to pin 8 of the digital pin, making the pin have 5V across it, hence HIGH. And when the button is unpressed, the circuit is open and pin 8 should be LOW.
Let’s continue.
if (buttonState == HIGH) {
digitalWrite(ledPin, HIGH);}
Here, using the if conditional statement, we check if the button is pressed, we turn on the LED using digitalWrite, otherwise
else {//turn LED off:
digitalWrite(ledPin, LOW);
}
Turn off the LED!
That’s all.
Now upload the code to the Arduino board. You should see your LED responding to the button press. Wait.. problem? You should observe that the LED is not responding as it should, it is toggled a fewtimes then it just stops, regardless of the state of the button.
Hold on let’s fix this.
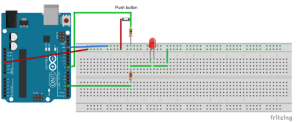
We fix this using our 10k resistor by connecting it as a “pull-down”resistor. Pulldown resistors are regular resistors used to make a pin maintain the ground state when it should, without it, our input pin would be in a “floating state” rather than LOW, the resistor provides a path to ground for pin 8, whilst not affecting the HIGH state.
Done!
All should be right with your code now. Upload it to the board and see it work.
An advancement to this is the debounce example found under
Files>Examples>Digital>Debounce
This example goes a bit further, replace the pin numbers and upload it to your Arduino and…
Voila!
I would explain this particular example next time, until then
Stay Awesome
Yours Geekly
Luqman Bello

