- You have no items in your shopping cart
- Subtotal: ₦0.00

Hi guys, this is the second tutorial in a series of tutorial planned to get beginners up to speed with electronics using the hub360 Arduino Kit. For this tutorial, we will be focusing on another interesting sensor present in our arduino kit, the versatile ultrasonic sensor. We will learn the principles of operation of this sensor and figure out how to use it with arduino.
Principle Of Operation
The Ultrasonic sensor sends out high frequency waves (About 40khz) which are reflected back when it strikes an obstacle. The time span between the transmitted and reflected waves is measured by the micro-controller. This time is then used ti extrapolate the distance between the sensor and the obstacle.
The micro- controller sends a pulse through the software code, to the ultrasonic sensors which in turn transmits a wave form. Simultaneously, a timer in the software code is activated and runs until the waveform is received back. Once the waveform is received, the sensor sends a signal to the micro-controller and the timer value is counted and the distance is determined.
Connecting to the Arduino
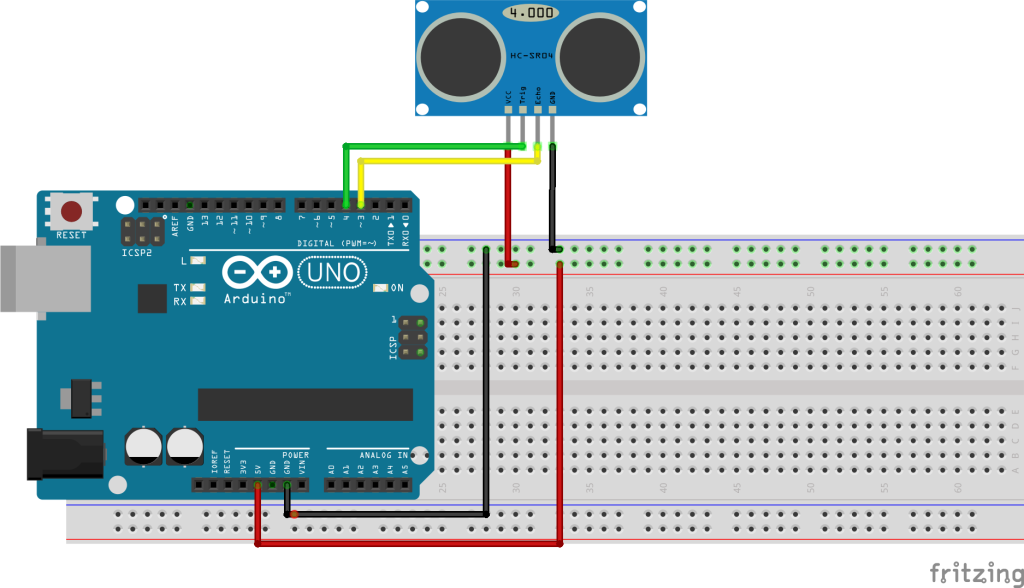
The ultrasonic sensor has four pins; Gnd, VCC, Trig and echo (Which are connected to the Arduino digital pins). The pulse is sent out by the Arduino via the trigger pin and received via the echo pin.
Components needed
1. Arduino Uno
2. HC-SRO4
3. Jumper Wires
4. Breadboard
Schematics
Connect the components as shown in the schematics below.
With the component connection done, connect the arduino to your computer and while we write the code.
Code
As usual, we will do a little explanation/breakdown of the code and I will leave you with the code at the end.
The first thing we do with the code as usual is declare the pins of our arduino to which we are connecting things and declare other variables that may assume a global status throughout the scope of the project.
/*
* Hub360 Circuits
* Hub360.com.ng
*
* Connecting HC-SR04 to the Arduino
*
*/

const int trigPin = 4;
const int echoPin = 3;
long duration;
int distanceCm, distanceInch;
Next we move to the Setup function.
The first thing we do is call the serial.begin() function and specify the baud rate at which we want to communicate. We will be using the serial monitor to display the values coming from our ultrasonic sensor i.e distance in cm and inches.
After this, we then specify the state at which the pins earlier declared will function. The trigger pin being set to output since the arduino will be sending signals out through it and the echopin set to input since the arduino will be receiving the echoed sound through it.
void setup()
{
  Serial.begin(9600);
  pinMode(trigPin, OUTPUT);
  pinMode(echoPin, INPUT);
}
With the setup function all set, we proceed to the loop function where the main work is done.
the first six lines of the loop function handle the process of sending the signal out from the Arduino and receiving it back. This could all be placed in a function but its better this way for beginners so we don’t have to explain the concept of functions.
void loop()
{
  digitalWrite(trigPin, LOW);
  delayMicroseconds(2);
  digitalWrite(trigPin, HIGH);
  delayMicroseconds(10);
  digitalWrite(trigPin, LOW);
  duration = pulseIn(echoPin, HIGH);
the rest of the code was written to convert the output of the sensor to cm and inch and display in the serial monitor.
distanceCm= duration*0.034/2;
  Serial.println("Distance in cm:");
  Serial.print(distanceCm);
  distanceInch = duration*0.0133/2;
  Serial.println("distance in inch");
  Serial.print(distanceInch);
copy the code, paste in the arduino IDE and upload to your board. you should see the distance data start streaming in.
That’s it guys, let me know if you have any questions.


