- You have no items in your shopping cart
- Subtotal: ₦0.00
hi guys, welcome to this tutorial. It’s safe to say 80% of the projects you will do with the raspberry pi will be without a screen due to its effectiveness as a server, or at most, the projects will be with a touch screen or a monitor, so this tutorial could be said to exist for those 20% projects for which we may need the 1602 LCD Display.
In this tutorial, I will show you how to print data to an LCD display via a python script.
Required Components
The following components will be needed for this project;
1. Raspberry pi 3
2. Micro SD Card (8 or 16GB) running Raspbian jessie
3. 1602 LCD display
4. Jumper wires
5. Breadboard
6. Ethernet cable
7. USB power supply for the Pi
8. Potentiometer
9. Resistors
Schematics
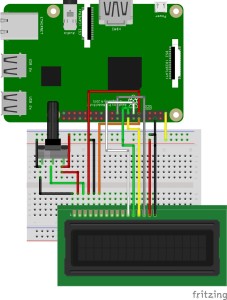
connect the components listed above as shown in the schematics below.
with the connections all done, we can then move to writing the python script.
Preparing the Raspberry pi
with our connections all done, we need to prepare the raspberry pi before writing the code. While I will assume we are all familiar with things like installing an OS on the raspberry pi, and communicate with the pi via a terminal software like putty, You can also find the information on how to do those things with the Pi on several other tutorials on this website like this.
While we could write our own LCD code from scratch and handle all the heavy lifting involved ourselves, it makes no sense since there is already a library that we can use to handle things. We will be using the display library from adafruit which can be downloaded from here. It’s designed for Adafruit LCD boards but will also work with other brands as well. If your display board uses a HD44780 controller then it should work with no issues at all.
follow the steps below to install the library.
1. Clone the adafruit git directory;
git clone https://github.com/adafruit/Adafruit_Python_CharLCD.git

2. change into the directory we cloned and install the setup file.
cd ./Adafruit_Python_CharLCD
sudo python setup.py
As soon as the installation is done, we are then ready to write the code and call the library from inside our python script.
Code
With the code below we will print hello world to our LCD screen.
Lets drop the whole code first before going through it for explanation.
import time
import Adafruit_CharLCD as LCD

# Raspberry Pi pin setup
lcd_rs = 17
lcd_en = 18
lcd_d4 = 27
lcd_d5 = 22
lcd_d6 = 23
lcd_d7 = 10
lcd_backlight = 2

# Define LCD column and row size for 16x2 LCD.
lcd_columns = 16
lcd_rows = 2

lcd = LCD.Adafruit_CharLCD(lcd_rs, lcd_en, lcd_d4, lcd_d5, lcd_d6, lcd_d7, lcd_columns, lcd_rows, lcd_backlight)

lcd.message('Hello\nworld!')
# Wait 5 seconds

time.sleep(5.0)
lcd.clear()
text = raw_input("Type Something to be displayed: ")
lcd.message(text)

# Wait 5 seconds
time.sleep(5.0)
lcd.clear()
lcd.message('Goodbye\nWorld!')

time.sleep(5.0)
lcd.clear()
Code Explanation
To explain the code one after the other.
The first two lines of the code includes the needed libraries, which are the time library(used because of the sleep function) and the Adafruit char LCD library.
import time
import Adafruit_CharLCD as LCD
next thing is to declare the pins on the raspberry pi to which the LCD is connected.
lcd_rs = 17
lcd_en = 18
lcd_d4 = 27
lcd_d5 = 22
lcd_d6 = 23
lcd_d7 = 10
lcd_backlight = 2
Then we declare the LCD rows and Column size.
# Define LCD column and row size for 16x2 LCD.
lcd_columns = 16
lcd_rows = 2
Then we call the LCD.adafruit_charlcd functiona and pass in all the screen parameters.
lcd = LCD.Adafruit_CharLCD(lcd_rs, lcd_en, lcd_d4, lcd_d5, lcd_d6, lcd_d7, lcd_columns, lcd_rows, lcd_backlight)
Next we call the lcd.message function. The parameters supplied to this function is displayed on the screen, for this case, hello world was supplied with the \n in the middle serving as an escape character to print the world part on the line below(2nd row).
lcd.message('Hello\nworld!')
The time.sleep function is then called. This pauses the system execution to allow the displayed message spend sometime on the screen. after the pause with the sleep function, the LCD.clear function is then called to clear the data being displayed. This makes the screen go blank.
# Wait 5 seconds

time.sleep(5.0)
lcd.clear()
Every other part of the code is pretty much a repetition of the commands explained above.
To get the code working on your raspberry pi, Create a new python file named lcdtest.py by running the code below from the terminal;
sudo nano lcdtest.py
This will open the nano editor. Copy the full code or type it out into the terminal. When done, press CTRL+X followed by y to save and exit the editor.
With this done, run the command;
sudo python lcdtest.py
to run the script. It should work like a charm.
The 1602 LCD is very useful for project where you need to display minimal information to the user, information like, “enter your password”, “login accepted” etc.
You can go through several examples attached to the library to get tons of use cases that could help you fully maximize the capabilities of the LCD module.
That’s it for this tutorial guys. Don’t forget to tune in for sensors Tuesday!
Let me know if you have any questions using the comment section. I always be at hand to reply.
Have a great week.
Cheers


hello Learning Lead am also good at making stuffs but i can’t find a link direction for posting.
pls i need hints from you