- You have no items in your shopping cart
- Subtotal: ₦0.00

Hi guys, welcome to this arduino series, its great to be handling this set of tutorials for the hub360 community. These set of tutorials will take you on a journey where you will get to learn everything about the arduino in a sequential manner. The tutorial series will have something for everybody, from an arduino newbie to those with verse experience with microcontrollers but have never worked with the arduino.
To jump right in,
The Arduino (according to arduino.cc) is an open-source electronics platform based on easy-to-use hardware and software. Arduino boards are able to read inputs (light on a sensor, a finger on a button, or a Twitter message ) and turn it into an output ( activating a motor, turning on an LED, publishing something online). You can tell your board what to do by sending a set of instructions to the microcontroller on the board. To do so you use the Arduino programming language (based on Wiring), and the Arduino Software (IDE), based on Processing.
Over the years Arduino has been the brain of thousands of projects, from everyday objects to complex scientific instruments. A worldwide community of makers – students, hobbyists, artists, programmers, and professionals – has gathered around this open-source platform, their contributions have added up to an incredible amount of accessible knowledge that can be of great help to novices and experts alike.
Arduino was born at the Ivrea Interaction Design Institute as an easy tool for fast prototyping, aimed at students without a background in electronics and programming.
As soon as it reached a wider community, the Arduino board started changing to adapt to new needs and challenges, differentiating its offer from simple 8-bit boards to products for IoT applications, wearable, 3D printing, and embedded environments. All Arduino boards are completely open-source, empowering users to build them independently and eventually adapt them to their particular needs. The software, too, is open-source, and it is growing through the contributions of users worldwide.
There are different types and versions of the arduino, from the very popular Uno to the almighty Arduino 101 amongst several others. All of these boards can be ordered on Hub360 here. For the purpose of this tutorial though, we will be working with the arduino Uno because of its popularity and flexibility.
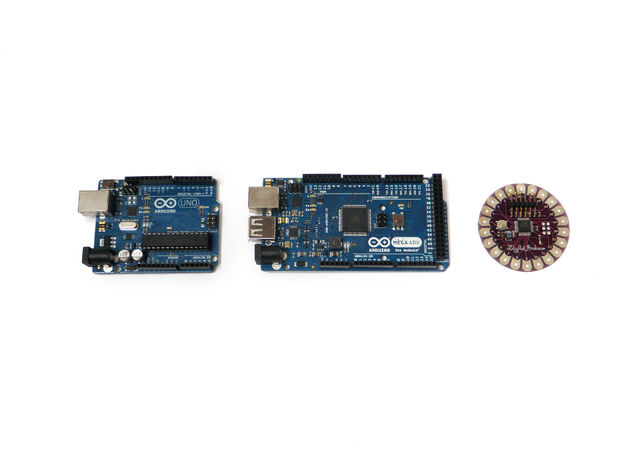
Before we start working with the arduino, its important we go through some of the features of the Uno which we will be working with.
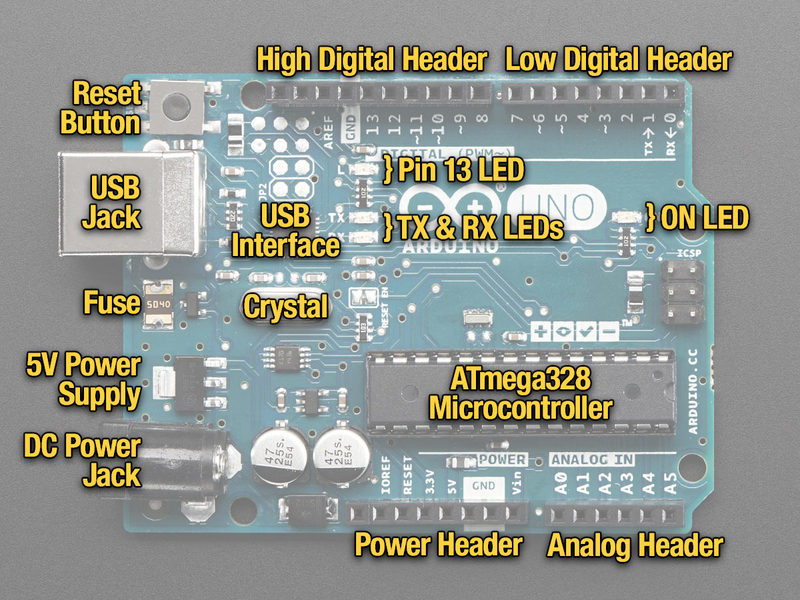
Some people think of the entire Arduino board as a microcontroller, but this is inaccurate. The Arduino board actually is a specially designed circuit board for programming and prototyping with Atmel microcontrollers.
The nice thing about the Arduino board is that it is relatively cheap, plugs straight into a computer’s USB port, and it is dead-simple to setup and use (compared to other development boards).
Seting Up
The goal of this particular episode of the tutorial series is to get everything setup for the journey which we will embark on for the next couple of weeks.
Before you can start doing anything with the Arduino, we obviously have to get the arduino Hardware which is available here on hub360. I will advise you get the arduino kit so you can get all you need once and for all. After getting the Arduino hardware you need to download and install the Arduino IDE (integrated development environment). The arduino IDE based on the Processing IDE and uses a variation of the C and C++ programming languages. It is used to upload codes(firmware) which determines how the Arduino processes inputs(from sensors) and give outputs(via actuators). After Installing the Software, you will need to connect the arduino board to your computer, which will automatically assign a com port to the arduino board. The IDE is the setup to communicate with the arduino via the comport as shown in the image below.

So thats it your arduino is all setup to do some of the superb and interesting things.
Bliky-o-iyk
you can take it for a test drive by loading the blink example to your board.
The blink example can be found on the arduino IDE:
Files –> Examples –> Basics –> Blink
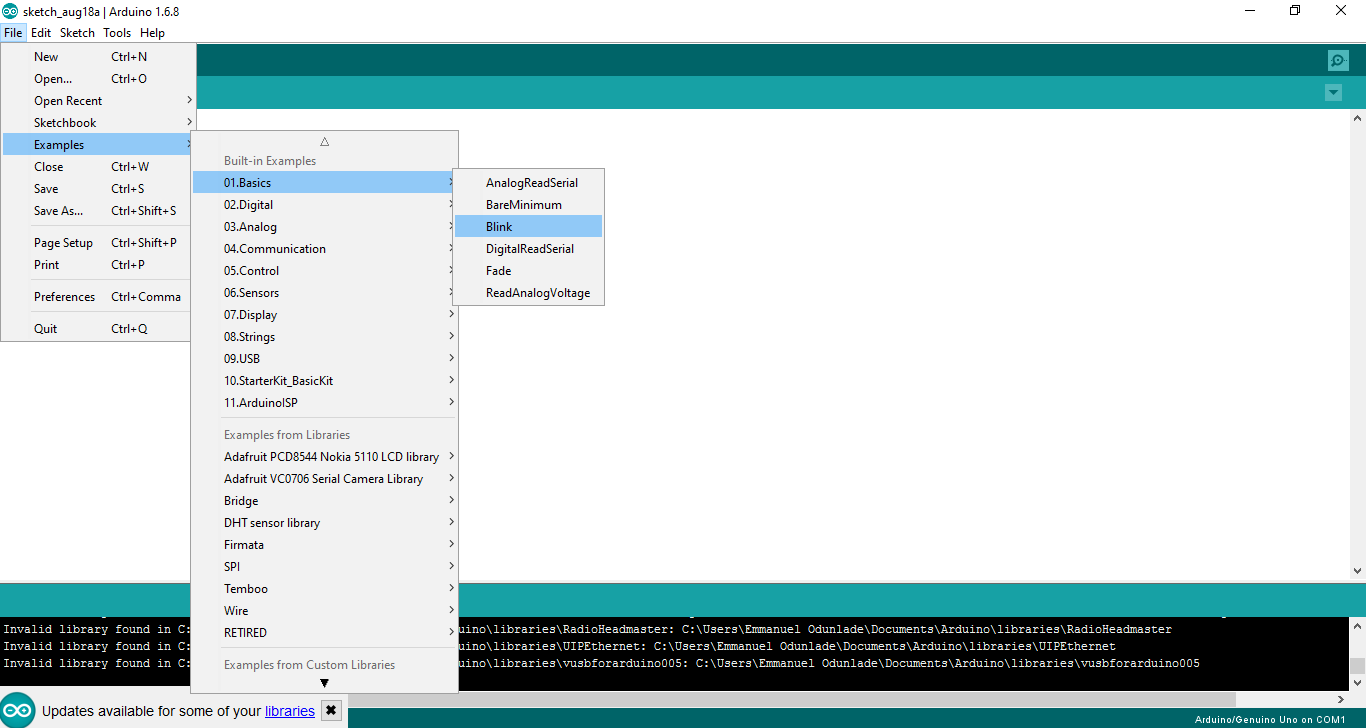

The blink example basically sets pin D13 as an output and then blinks the test LED on the Arduino board on and off every second.
Once the blink example is open, it can be uploaded to the MCU on the arduino board by pressing the upload button, which looks like an arrow pointing to the right.
Notice that the surface mount status LED connected to pin 13 on the Arduino will start to blink. You can change the rate of the blinking by changing the length of the delay and pressing the upload button again.
Yup that’s officially your first arduino hack!
See you next week as we dive deeper into the world of the arduino. Please feel free to drop comments and questions also feel free to share tips if you have any issue with the way the tutorial is been structured.
so that’s it for this week!
See you around
Yours Truly
Bello Lukman

thanks for the tutorial