- You have no items in your shopping cart
- Subtotal: ₦0.00

Introduction
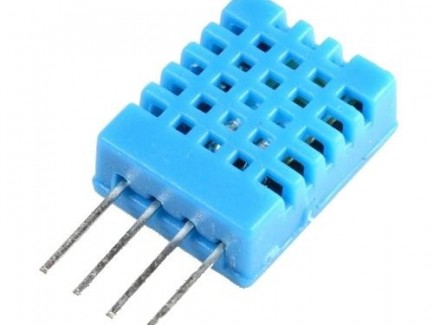
Another cool sensor present in the Hub360 Arduino kit is the DHT11 temperature and Humidity sensor. The DHT11 is a low cost temperature and humidity sensor that operates using the 1-wire protocol.

it features a calibrated digital signal output with the temperature and humidity sensor complex. Its technology ensures the high reliability and excellent long-term stability. This sensor includes a resistive element and a sense of wet NTC temperature measuring devices. It has excellent quality, fast response, anti-interference ability and high cost performance advantages.
Each DHT11 sensors features extremely accurate calibration of humidity calibration chamber. The calibration coefficients stored in the OTP program memory, internal sensors detect signals in the process, we should call these calibration coefficients. The single-wire serial interface system is integrated to become quick and easy. Small size, low power, signal transmission distance up to 20 meters, making it a variety of applications and even the most demanding applications. The product is 4-pin single row pin package. Convenient connection.
Connection to Arduino
The DHT11 temperature and humidity sensor uses a capacitive humidity sensor and a thermistor to measure the surrounding air, and spits out a digital signal on the data pin (no analog input pins needed). Its fairly simple to use, but requires careful timing to grab data. so the sensor interfaces with the arduino via a digital pin.
Schematics
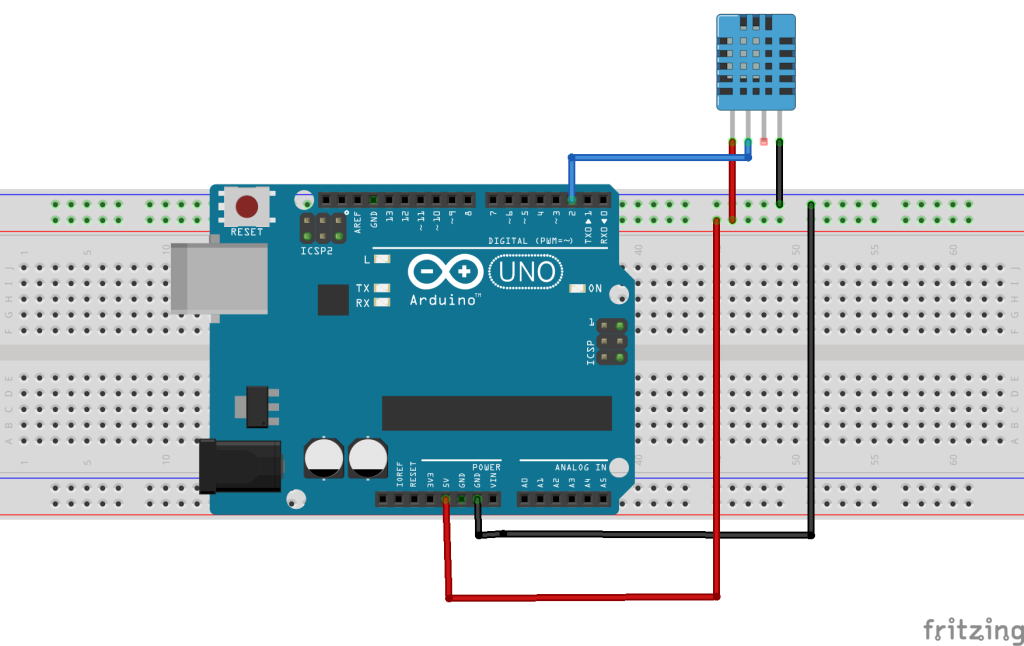
Connect the components as shown in the fritzing schematics below.

with connection done, we can jump to the code to make it work.
Code
Before we start, we have to download DHT library and set its type. The required library is available on github. Download it and extract it into Arduino libraries folder, then open Arduino IDE. Its probably important to note at this point that the library will not be visible to an Arduino IDE instance that was already running before installation, you have to restart the Arduino IDE after installing the library.
With our library installed, we can move to the code analysis:
The first thing we do in the code is include the LCD dependency it needs to run.
//hub360.com.ng/learn
//interfacing DHT11 with the arduino


#include "DHT.h"
Next we define the pin the DHT11 DATA pin is connected to and also include the type of the DHT sensor we are using which is DHT11. After this, we create a DHT object and then pass in the pin number (DHTPIN) and the sensor type (DHTTYPE).
DHT dht(DHTPIN, DHTTYPE);
#define DHTPIN 22     // what pin we're connected to

#define DHTTYPE DHT11

DHT dht(DHTPIN, DHTTYPE);
with the definitions done, we move to the setup function. we will be using the serial monitor as a debug tool to see the data that the DHT11 sensor is churning out. The communication baud rate is set to 9600, after which a introductory print is done followed by a command to get the dht up and running.
void setup(void) {
  Serial.begin(9600);
  Serial.print("Reading sensor");
  dht.begin();
}
Moving on to the loop() function, we create two variables of type float which will hold the temperature and humidity value, give it a delay of two seconds after reading values into them and then display on the LCD before clearing.
void loop() {

  float temperature, humidity;

  humidity = dht.readHumidity();
  temperature = dht.readTemperature();
  delay(2000);


 char tempF[6];
 char humF[6];
 dtostrf(temperature, 5, 1, tempF);
 dtostrf(humidity, 2, 0, humF);

 Serial.print("T:");
 Serial.print(tempF);
 Serial.print((char)223);
 Serial.print("C ");
 Serial.print("H: ");
 Serial.print(humF);
 Serial.print("%");
}
The whole code is found below.
//hub360.com.ng/learn
//interfacing DHT11 with the arduino


#include "DHT.h"


#define DHTPIN 22     // what pin we're connected to

#define DHTTYPE DHT11

DHT dht(DHTPIN, DHTTYPE);

void setup(void) {
  Serial.begin(9600);
  Serial.print("Reading sensor");
  dht.begin();
}

void loop() {

  float temperature, humidity;

  humidity = dht.readHumidity();
  temperature = dht.readTemperature();
  delay(2000);

 char tempF[6];
 char humF[6];
 dtostrf(temperature, 5, 1, tempF);
 dtostrf(humidity, 2, 0, humF);

 Serial.print("T:");
 Serial.print(tempF);
 Serial.print((char)223);
 Serial.print("C ");
 Serial.print("H: ");
 Serial.print(humF);
 Serial.print("%");
}
Upload the code onto your micro controller and it should work like a charm.
That’s it guys. let me know if you have any questions via the comment section.


